Model 28 TTY project...
|
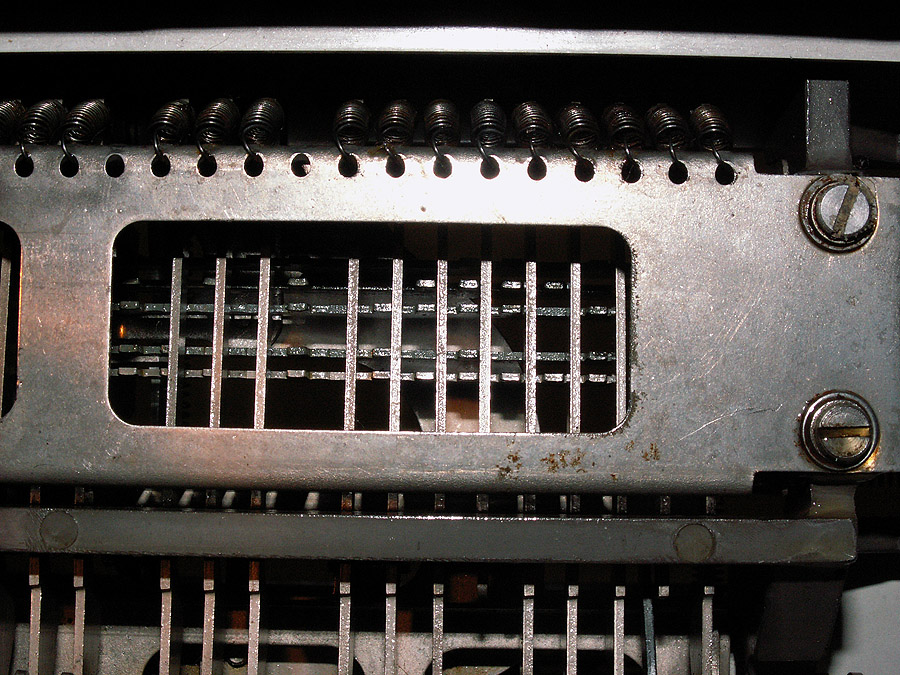 |
| In the picture above - note the sixth keylever from the right (the fourth from the right visible through the opening in the keylever frame where you can see four of the five code bars): all five code bars have a "tooth" just to the left of that keylever - (again you can see four of them here; the fifth is in the flash's shadow). Those "teeth" program the "BLANK" character when the repeat key is held down... preventing the intended character from being generated. Since the repeat function isn't a "critical" issue - at least at this time - this issue can wait until the next time the keyboard is apart for some reason. I was tempted to try to snap off those five teeth "in place" by reaching through the keylevers with some appropriate tool- but as can be seen here - clearance is an issue - and I'm afraid that trying to "cram" needlenose / and or mini-vise grips in there would likely distort - perhaps even bend some parts. Better to do it right - and there certainly isn't a "rush" to get that "functionality" back. |
|
|
|
The URA-8 side project...
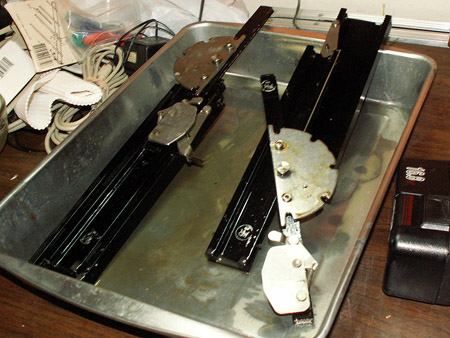
In the mean time - another "aspect" of the project has come along - that needs more attention than I had anticipated. Our intention is to be able to receive off the air RTTY as we did "back in the day" - which was done with several radio receivers; a URA-8 tone converter, and appropriate patch panel, loop power supply, etc. We still have the receivers; a URA-8 converter (though there are issue with this unit); the loop supply - and I think a suitable jack panel (I didn't totally loose my mind - just a slip of "stupid" when I let our original 28 get away from us). We HAD two complete URA-8s - but sometime back - one compete unit - and the cabinet to the other came up missing. Best we can figure - one time when we had some storm damage - and had some help cleaning up - those were accidently "cleaned out" into the trash (when you take a ton or better pecan limb through a roof - things can be chaotic for a time while repairs and clean-up take place). We've since acquired a complete URA-8 (thanks to Rick); and a cabinet (thanks to Riceguy) for the one we still have (we even have the filter "module" for the remaining URA-8 - which is usually bolted into the cabinet - go figure!). Both cabinets have a problem, though - the slides are so stiff - that it's difficult to get the drawer in and out of one - and near impossible with the other one... In fact the other one is so stiff - it has to be pried out of it's case with a stout pry bar. |
  |
| At first - I "assumed" that it was just that the grease had hardened - and that a good cleaning and lube would restore them to proper operation. WRONG! |
 Turns out there are these plastic "dowels" that are used as bearings between the slides - and it seems after all these years - the plastic has "expanded" a bit - enough that the slides become almost locked together. The only solution is to physically reduce the size of these "dowels". I don't have a lathe, and I'm not that good with one anyway -- hey - it takes some idea of what and how to do - then lots of practice to get it right - which I have very little of - not with a lathe, anyway. I do have some wood-working experience, though - including some fair amount of cabinetry using dowels. Turns out there are these plastic "dowels" that are used as bearings between the slides - and it seems after all these years - the plastic has "expanded" a bit - enough that the slides become almost locked together. The only solution is to physically reduce the size of these "dowels". I don't have a lathe, and I'm not that good with one anyway -- hey - it takes some idea of what and how to do - then lots of practice to get it right - which I have very little of - not with a lathe, anyway. I do have some wood-working experience, though - including some fair amount of cabinetry using dowels.Doing some measuring - I find that the dowels have swollen to between .3115 and .316. Doing some "test fitting" with drill bits in place of a dowel shows that a 19/64ths drill bit is about perfect. While that's not a lot - smaller (.296875 vs. an average of .3138 - or about 17 thousandths) it shows two things: not the same amount needs to come off of the dowels - some need more some less - and two - 17 thousands is a small amount - it'd be hard to take that off "freehand" --- some better way needs to be found.
|
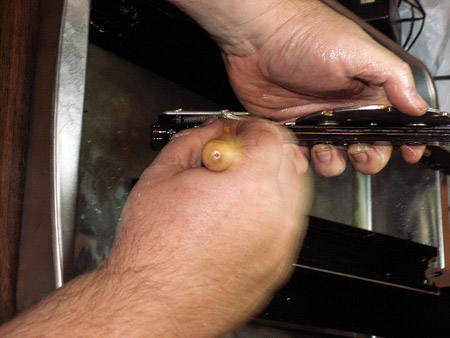
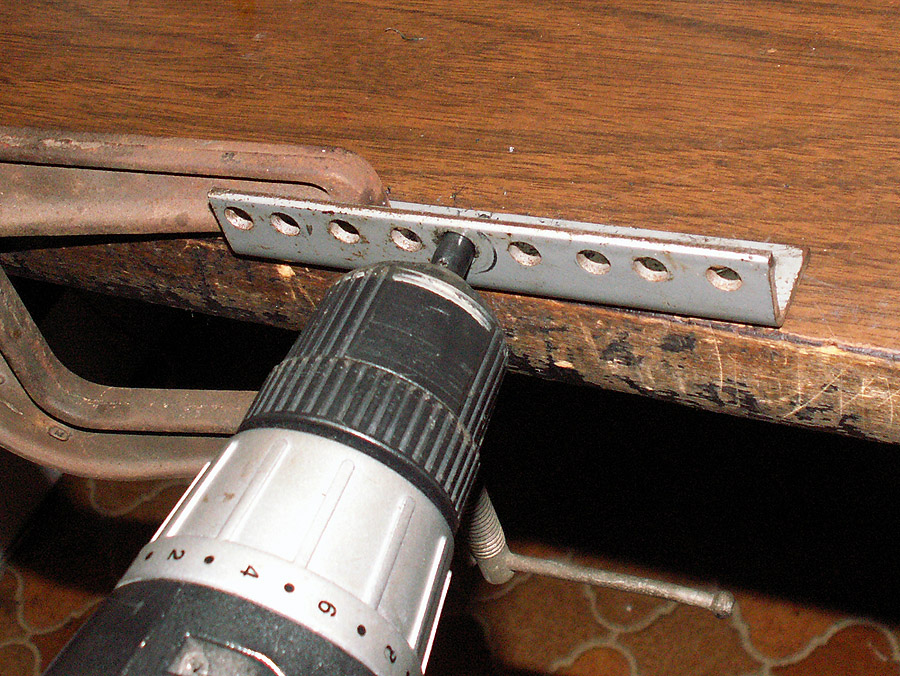
| As noted - I've worked with dowels - and do have several "jigs" and special tools - including some dowel "sizers". Problem is, though - the sizers I have are in much more "common" sizes - 1/4", 3/8", and so on. Here I need a 19/64ths. Well - I have a 19/64ths drill bit - some pretty hard steel why not make one? I do just that. I carefully drill a 19/64ths hole through a piece of angle iron that already has holes for 1/4 inch bolts - (i.e. about 9/32nds) then taking a miniature triangle file and "cutting" teeth around the inside of the hole. Think of it sort of like a thread die. |
 |
| The dowels are then chucked up in a high-speed drill - and slowly worked through the hole. It takes a little time - but eventually - the "teeth" I've filed eventually bite in and "thread" the dowel through - then it's a matter of slowly running the dowel in and out of the hole to uniformly cut it down. |
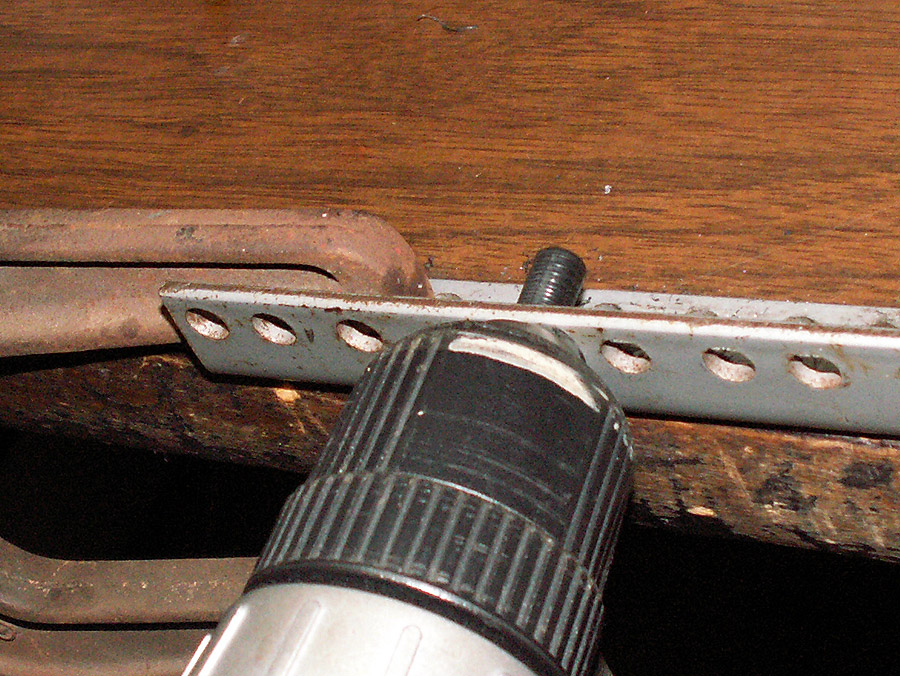 |
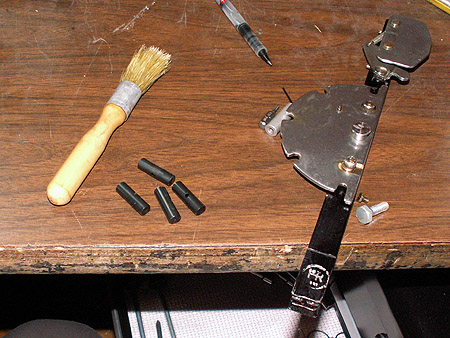
| Here you can see the "threads" cut into the dowel on the first "pass" in... |
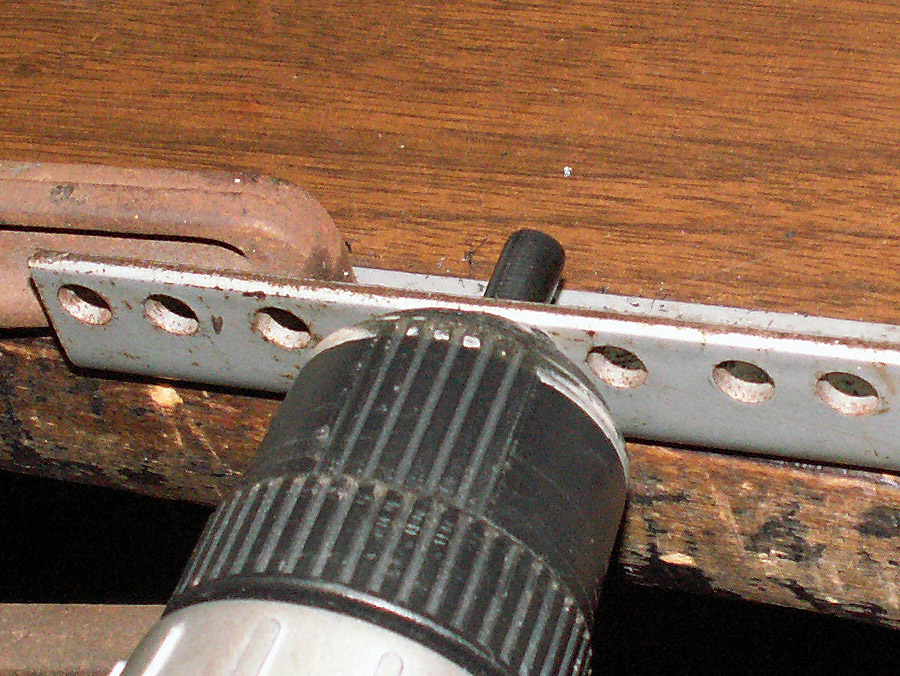 |
| Here the "threads" have been evened out pretty well - the dowel is taken out of the chuck - and allowed to cool while the rest of the dowels are run in turn. Once cool - the dowel is chucked up "turned around" - and the other end is then turned down. Several passes are made - allowing the dowel to cool in between so that we're doing more "cutting" than "melting" - after all - this dowel sizer is rather crude. Once turned down, the slides are re-assembled and greased. Now the slides move as they should - free - yet no "play" or "slop". Now I can get at least one URA-8 whipped into shape - the goal is to have it totally military original - and functioning like new. We'll do a page or two on that sometime in the future. |
Click here for VERY short video of slide - sliding:  |
|
|
| Yet another detour - The Refrigerator saga...
It really staggers the imagination - how something that should be "no big deal" can be a major PITA... What's this got to do with teletypes? Time and money. Very little spare time to work on stuff - and having a casualty that could run 4 figures to "fix" - well - you don't buy supplies for a "project" when you're looking at those kinds of possibilities. |
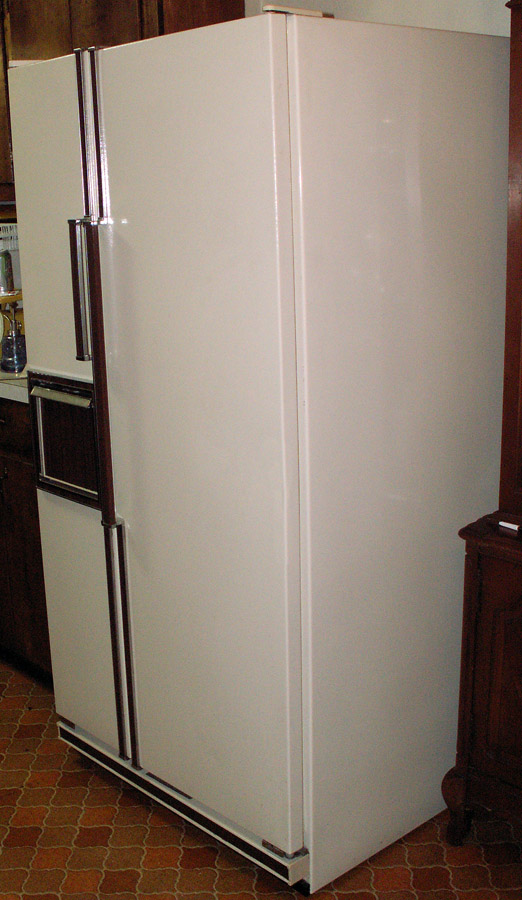 |
| The culprit this time... our faithful Kenmore / Whirlpool refrigerator. |
| I'm not sure why I have this "need" to fix things... most people just replace - but I also find it hard to spend $1200-$1500 on something "new" - when less than $500 should fix the otherwise perfectly good "old". This is yet another example. I mean - after all - this thing is only 30 years (and three months) old - and it was (in it's day) about as good as Whirlpool engineers could make - which is pretty good. Up until the compressor died - we had only had to repair it a couple of times: the evaporator fan motor went out about 7 years ago - and a micro-switch crapped out in the ice maker about three or four years ago. This unit has one of the famous (or infamous according to some folks) "Flex-Tray" ice makers - which not only makes ice - but also controls the defrost cycle. So if that switch breaks - no power to the cooling "stuff". However - neither repair was very expensive - nor took very long to do. The main "plus" to this series of refrigerators (which, by the way - Whirlpool was proud to note they still make) is that there are independent controls for several "sections" - so that food can be kept a very long time (we're talking in the refrigerator here - not the freezer): Cooked meats 3-4+ weeks; Milk 2+ weeks; cryo-vac packed fresh beef 4-5 weeks - and so on. The main part of the refrigerator stays about 32 degrees; the "meat drawer" (which is enameled steel) stays about 30 degrees; the upper freezer about 0; the lower freezer about 3 below - the ice bin about 10 degrees - all of which can be adjusted to suit. The refrigerator shelves are tempered glass - cantilevered and fully adjustable - inside walls are steel, not plastic. You get the idea - there is little that we want from a refrigerator that it doesn't have. So why pay $1200 - $1500 for something similar (with LOTS more plastic than steel)- when $500 should fix it?
Yeah- I can hear the boo-birds: "You gotta be kidding? repair a 30 year old fridge? It's all worn out!" Think so? - judge for yourself: |
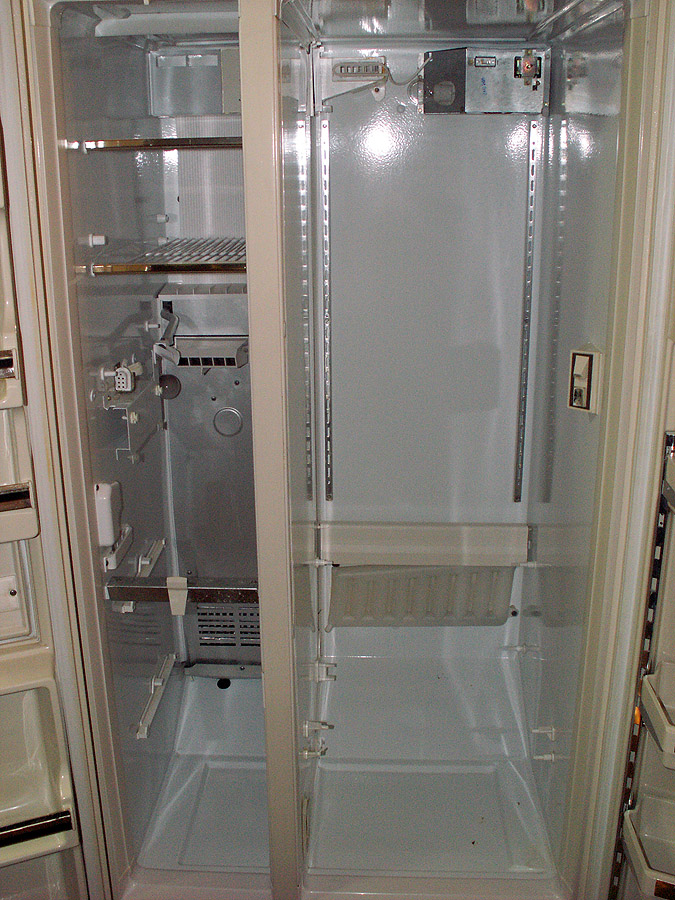 |
| Here's the insides while we had it apart to clean. This is the first time it's ever been this far apart since new. No tricks here - no touch-ups. If you look close - you can see a couple of rust spots in the bottom floor of the refrigerator side. As noted - the only parts ever replaced to this point was a switch in the ice maker - and the evaporator fan - that lives behind that silver panel in the back of the freezer section just above the evaporator coils. |
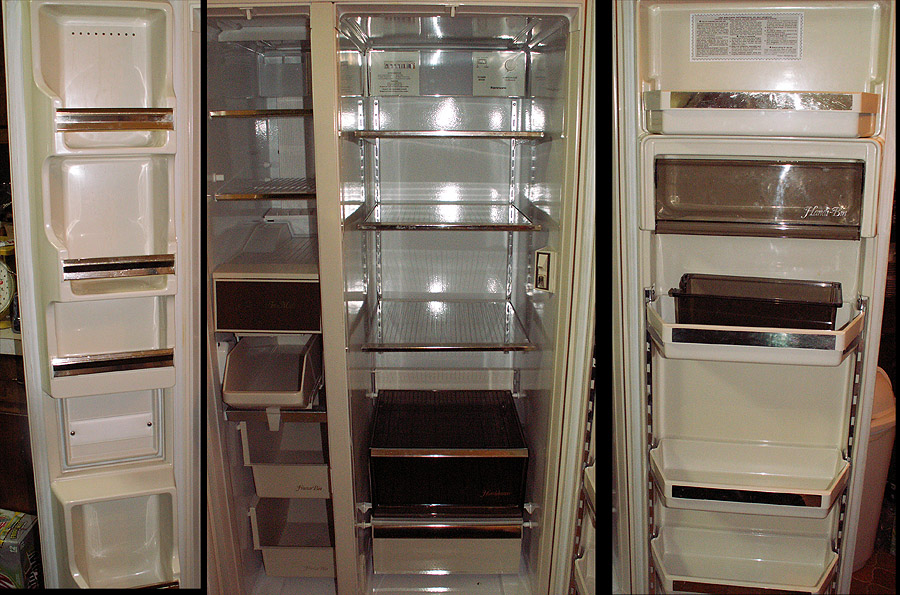 |
| Here it is with the shelves, bins and trim back in place. You see any reason to replace this? What would $700 - $1000 buy that isn't already here?
Not much, in our opinion. OK - so maybe if I were buying one today I'd get black instead of almond. For the kind of dollars we're talking - I can live with almond. Most companies just don't build stuff like this anymore- it's refreshing to hear that Whirlpool does (pretty close, anyway) - and they just scored their 11th year in a row for lowest number of repairs on refrigerators according to "a leading" consumer magazine. I'm sure they would have liked me to buy a new refrigerator - but they sent materials I requested anyway (via FedEx - their nickel). That's above and beyond what most companies do today. The casualty: Tuesday evening - Sherry heard the refrigerator "clicking" much too often - and didn't hear that familiar z z z zzzzt of the motor starting. She called me in where I confirmed it was the overload - and the compressor wasn't starting. After letting it cool down for an hour - tried it again - same thing. Moved all the contents to a friends house who has some cold space to spare. Got a new start cap next day - hooked it up - and plugged it in... z z z zzzzt came that familiar sound. Well - maybe that's all - after all - that start cap is old... and caps to fail. 20 minutes later - we're back to the overload cycling. So I call a guy I know who does a lot of this type of work - and also happens to be a county supervisor. After two days - he still hasn't been able to get loose long enough to come take a look - seems there is some sort of financial crisis - and the county budget is in a mess. Being the President of the board of supervisors - he is understandably busy. But - It's now Friday - and I need some help. I call a friend who owes a local tourist trap - er - travel store - on the interstate - and see who's doing his work since it's obvious the guy we usually use is tied up. He gives me a name and number - and I make the call. "You want to WHAT? Um, I see." You could hear the doubt clearly - but he came anyway - and by mid afternoon - had the replacement compressor on order. Seems the government has stuck their (IMHO) stupid noses into stuff they shouldn't - and as a result - you can't get compressors for R-12 any more - you have to convert to something else. Whirlpool has a replacement designed for this machine (and most of the pre-1995 "Gold-line" series), but it uses R-134a refrigerant instead of R-12. Whirlpool says it'll work just fine in this unit - so why not? They do note that you have to follow the conversion instructions exactly - and that the amount of R-134a is critical. This one point would come back to bite us. Tuesday night the new compressor was installed - system purged and "sweep" charged - everything looked good. Then the guy removed the low side service hose - and lost a bunch of refrigerant. Seems the new service valve he installed didn't work right. He replaced the core - and then "topped off" the 134a - and it seemed to work. However - "work" it did - the compressor never would shut off - except when the unit went into the defrost cycle. The temperature in the refrigerator would eventually get down to the mid 30s - but the freezer never got below 12 degrees - and that took hours. I called him late Wednesday - after we were sure it wasn't going to get any better- and he said he'd be back out as soon as he could - which turned out to be Saturday morning. In fairness - he was working us in between commercial calls - which are his bread and butter - after all - a refrigerator is an inconvenience - a walk-in chill box can contain a major investment ($$$) in drinks and food - which could be devastating to a business if lost. Saturday morning - he completely purged the system, let it draw down for several minutes - then charged with exactly 7.9 ounces of R-134a. Almost immediately the high-side line got too hot to grab - and the low side was quite cold. He buttoned it back up - and went on his way. Now the freezer is running about -2 degrees - the refrigerator (near the top) is at 29 - and it cycles off and on as it should. I''m slowly adjusting the master cold control to bring it back up to 32 (and 0 in the freezer). I'll trim the freezer and meat drawer adjustments after things settle for a while. The problem - of course - was time, budget and meals. I was stuck here a lot waiting for call backs - and to be here when he needed to work on it. Meals - without our usual "stuff" to prepare meals - Sherry has become a fixture at the local Chic-fil-A , Wendy's and Captain Ds, etc. And with no sure outcome (this was a "conversion", after all) - we didn't know how much we needed to budget for this project... The fact that it's worked out (keeping fingers crossed and an eye on the thermometers) - is nice - but had it failed - we'd be out the cost of parts and service - PLUS have to buy a new refrigerator. I'm sure the guy would have worked with us on those costs - but he's been in this business 35+ years - and hadn't changed a home refrigerator compressor in 10 years to the best of his memory. I was the one that talked him into that course of action - wouldn't be fair to ask him to assume all the risk. How to chew up 10 days real good! |
|
|
| So how are we doing on our "ToDo List"?
1) Figure out what to do about the transmission "shifter" linkage. Right now the shift "collar" is just spinning loose. Yeah I can reach back and shift it -- but there is no outer stop. One pull too long - and I get to reassemble the shift mechanism - that is if it's not damaged in the process. Not a super high priority at this time - as most of the copy we're doing is at 60wpm... we do little shifting. The final "configuration" of the shift linkage might also be incfluenced by whatever cabinet we wind up with... a "shift" knob on the opposite of the power switch might be nifty - something done like the compacts. Of course since the chassis pivots up in a "standard" cabinet for service access - any such linkage would have to accomodate that... complicating that idea considerably. But hey - that's part of what this project is about - taking a plain-jane unit and tricking it out with all sorts of neat options. 2) Cabinet. It's here - or at least enough parts to build one. And it's a standard table-top. Needs a paint job (hmmmm light granite powder coat?) - now that the above "interruption" is out of the way - I should be able to start on it. Have the parts to do build the LESU - though I'm probably going to have to learn to do plating to do that right. Hmmmm purple annodized keyboard chassis under the typer? Hmmm.... Lot's of possibilites! 3) Another "trick" we intend to add to this unit is a local FIGS to LTRS shift. This is done with a small solenoid mounted so that it "kicks" the LTRS /FIGS code bar in the typer back "in"... which is the LTRS position. When the machine is at rest (i.e. solid Mark) the LTRS/FIGS bar can be moved easily. There are times during an active cycle, however - that the LTRS / FIGS bar is temporarily locked. During those times the solenoid simply does not have enough "push" to harm anything - and just waits until the stunt box cycles enough to unlock the bar - which then kicks in to accomplish the shift. The keyboard part of this is a local key installed in the "red row" with a switch to activate the solenoid. Wiring will have to be added to both the keyboard / keyboard connector / typer / typer connector to accomodate this mod. Teletype did issue this as an official "modification kit" but it's considered pretty rare - so finding the red "LOC LTRS" keytop may be something of a challenge. 4) The bell. As this typer was originally configured as an compact Read Only unit - the bell is attached right above the selector magnets, and wired accordingly. Normally the bell is installed in the cabinet in "none" compact cabinets. Since I intend to mount this in a more traditional style cabinet (vs. compact) - while I'm adding the wiring for the shutdown switch and LTRS solenoid, this is also a good time to pull the bell and change the wiring for it to standard wiring (vs. for a compact R.O.). |
|
|
|
Part nine will be the start of adding "stuff" to the autotyper...
 |
|
|
| Site contents copyright © 2008 Randy Guttery |
|
|